Followers

Sunday, March 17, 2013

Find me at A Tray of Bliss

Hi everyone...
 
Blogging is hard work sometimes.
 
To be successful at it, you almost need to treat it like a job.
 
I have two other blogs, A Tray of Bliss, and Cerebral Palsy Grapevine, and a joint one with my friend Kimmie at From Dimes to Diamonds.
 
Maintaining four blogs is almost impossible, and content and dedication to all of them suffers.
 
So I have made a decision to merge the content of all of them with my first blog, A Tray of Bliss.
 
This content will be imported from here to there over the next few days.
 
Please join me there if you wish. You'll find the link just to your right.

Thankyou for following here and I hope you'll join me.
 
 
.....Mama Guardian...

Wednesday, March 13, 2013

Delectable Orange Cake...

There is nothing like a home baked cake, straight from the oven, redolent of fruits or spices or loveliness of other kinds, to make the heart swell and feel rich.

I used to adore helping my Nanna cream the butter and sugar, adding the eggs, relishing the different textures in the batter, before sifting in the flour to make what I knew was going to be a mouth watering afternoon tea.

This moist and fragrant Orange Cake is my Nannas recipe...enjoy!

250gm butter, softened
1 cup caster sugar
Grated rind of 2 oranges
4 eggs
2 cups Self Raising Flour (gluten free is fine)
1/2 cup dessicated coconut
1/2 cup orange juice

Preheat the oven to 180C. Grease a ring tin or two loaf tins generously and dust with flour. Line with baking paper if you prefer.

Cream the butter and sugar until pale and fluffy. Add the orange rind and mix well. Add the eggs, one at a time, beating well after each addition.Sift in the flour and combine lightly. Add the coconut and the orange juice and stir, then tip into your prepared tin.

Bake for 30-45 minutes depending upon the tin you're using, testing with a skewer for done-ness. When the cake/s spring back when lightly touched, and a skewer inserted into the very middle, comes out clean, they're done.

Stand the cakes for a few minutes before turning out of the tin.

Dust liberally with icing (confectioners) sugar and serve with a steaming cuppa.

Enjoy!

Sunday, January 27, 2013

The Teen Queen Celebration....

 
Yes, it's happened.
 
The Diva, only girl child in a family of five, has become a teenager.
 
Unfortunately, a sadness surrounded our celebrations as we farewelled a much loved grandparent just a day or two before.
 
So how do you 'celebrate' when you don't feel like celebrating?
 
Well, this sublime cake in The Divas' favourite colour, helped. It was on my to-do list to make one myself, as has always been my habit, but this was beyond me in the midst of preparations for sadder occasions.
 
A local lady who charges little for her beautiful work was sourced, and with just 48 hours notice, she was able to produce this pretty-as-a-picture gluten free Red Velvet cake, to put a smile on any 13 year old girls face.
 
Orange themed party favours were assembled....
 
 
....with more orange themed food such as BBQ flavoured chips, Sunny Boy frozen Orange pyramids (a classic here in Australia), and Fanta ice cream spiders being enjoyed by all.
 
A disco ball outside on the deck,
 
 
...and Thrift Shop (clean radio edit version) on the iPod, and a fun time was had by all.
 
Life goes on.
 
We spent little, preferring to show The Diva, that celebrations can be had, without the hysteria surrounding the competitive birthday party culture abounding these days.
 
She had a ball, and so did her friends. It's the little things that make memories, not the big money.
 
Until next time...Mama Guardian x


Wednesday, January 23, 2013


Stars for you if you're still here.
 
Lord knows, I'm often too busy 'doing' to write about 'doing' here.
 
This year, I'm really focused.
 
A trip to a distant shore is in the offing, and substantial savings need to be made in order for said trip to happen.
 
I'll be sharing new lunch box ideas, yummy meals and ideas for saving on that darned grocery shop, week in, week out.
 
 
This year will be about using up every last skerrick of stuff in the pantry before even thinking about shopping. It'll be the year of less 'what's that green hair on the baked beans' and more of 'wow how did you make that little bit feed everyone!'.
 
It'll be about make do, make more from less and make it up as I go along.
 
Last night we had a hash brown slice, made from scratch and served with salad. We followed it up with gluten free peach crumble muffins and home made creme anglais.
 
This was after I looked in the refrigerator at 4pm, bereft of inspiration, certain a trip to the Stoopidmarket was on the cards.
 
But I stepped away from the car keys, went back to the fridge and had another look.
 
Yes we had potatoes, yes there was a stray tub of gherkin dip, some eggs, two slices of bacon. Yes there was still a tomato and half a cucumber. And at the bottom of the crisper, some peaches, wrinkled with age.
 
So there it was. Dinner and dessert. I just had to look harder.
 
Let's christen this the year of looking harder.
 
Looking harder at how we spend, how we shop, how we eat and how we allocate our resources.
 
Join me?

Tuesday, December 11, 2012

No cost gifts from the heart 4....


My daughter and I made these cards yesterday.
 
Our materials were:
 
2 sheets of white project cardboard at just $1 each
 
1 glossy Country Living magazine from the thrift store -50c
 
1 sheet of scrapbooking diamante` dots $1.50
 
A tub of glue (already had it)
 
Pastel artists chalk (completely optional...used them cause we had them)
 
Fixative spray (only for using with pastel chalks..already had it)
 
Glitter spray (completely optional..already had it)
 
Scrap lace, wool, kitchen string (already had them)
 
Standard sized postal envelopes (already had them)
 
So you see by our list, we used what we had on hand, and only spent $4 all up.
 
Here's how to make them:
 
1. Measure envelopes and decide size of cards. They need to be a little smaller than the envelope for a smooth fit.
 
2. Take the time to use a ruler and pencil to mark out the lines to cut on the cardboard. We decided on long cards to fit our envelopes, so measured out the lengths, and not quite double the width of the envelope to decided the size of the card when open. We'd be folding it in half to close the card and fit it into the envelope. So ours were marked out in squares of 21cm x 21cm, which folds down to a card 21 cms long and 10.5cms wide when folded.
 
3. Use sharp scissors or a paper cutting guillotine to cut the cardboard to size. Fold each card. We ended up with 6 full sized cards, 3 small cards and 6 gift tags from each sheet of cardboard. Nothing was wasted.
 
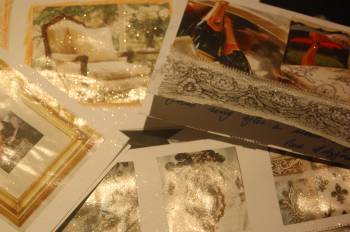
4. Cut images from magazines. Now of course the result hinges on the type of images you clip. Our magazine had lots of French inspired decorating ideas, and meshed nicely with the scrap lace and glitter we already had. So it was a good combo. Landscapes, animals, flowers, children, scrapbooking examples, and holiday destinations are all good candidates as well. Travel brochures could be a good no cost sourse of great shots to use. Trim to size of card, allowing some space for lace trim or other embellishments.
 
5. Be creative and group or overlap pictures, make a collage of themed pictures using a common element or colour (in our case, black or pink or floral or French). Glue into place.
 
6. Add lace. We then coloured over the lace in artists chalks to tone with the photos. This gives a very pretty effect, but needs to be sprayed with the Fixative spray or it will just come off every time you touch it. This has to be done when the lace is dry too, so either before you glue it or after the glue had dried.
 
7. Tie string, yarn, or craft ribbon around the spine and trim to make it look tidy.
 
8. Spray with glitter spray or glitter hairspray.
 
9. Embellish with other items as desired. Can I suggest some restraint? The best cards we did are the ones embellished with lace OR crystal dots OR glitter spray. Not all three. But ultimately, they're your cards so go with what grabs your imagination.
 
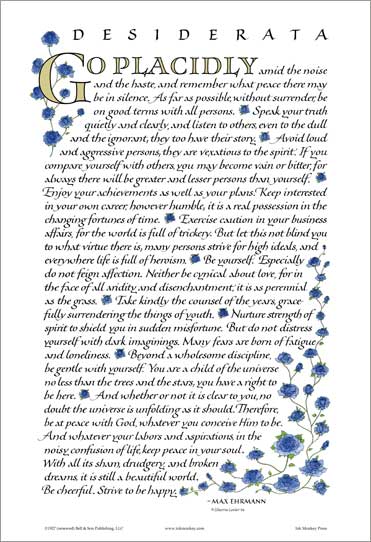
10. Google some inspirational quotes to hand write inside them. I found some lovely ones, chosen to suit the images on the cards, here.

11. Finally, when the glue is really dry, weight your cards down with some heavy books, platters, trays or anything else heavy you have on hand, and let them sit overnight. This makes them sit nice and flat and gives a better finished product.

Now, I know these are not for the experienced card maker amongst you. I know you can do far cleverer things.

These instructions are for those who are on a stingingly limited budget for whatever reason, and for the less experienced crafter.

As you can see, the results are still very pretty.

I hope I am helping you to see that Christmas truly can be about using what you have to inspire heartfelt gifts. Six of these cards, tied with lace, ribbon or string and presented in a box, hand stitched pouch or simply with a tag attached, could be a meaningful gift for anyone you love.

If you don't have money, you can use your time to create something beautiful. Don't rush, think of yourself as an artist, and really think about the images and the inspirational quotes and tailor them to the recipient.

Wishing you a Frugal Festive Season...

...until next time..

Mama Guardian


Thursday, December 6, 2012

No cost gifts from the heart 3....


Dig up all of those photos you couldn't frame or use for scrapbooking because they're out of focus or not centred or someone looks a bit goofy. I've used this one where my daughter, who was about 18 months old at the time, was trying to put on my sunglasses.

I'd just been taking photos of the gorgeous gardens where we'd been picnicing, and hadn't thought to manually focus on her before taking the shot. So although the garden bed in the background is crisp and clear, the otherwise cute photo has languished in my collection ever since.

I've now resurrected it, and will frame it side by side in a frame, with a little story about how the photo came about. There are other photos from the same day, framed in our hallway, so it will also be a way to tell her how those came to be.

Just a moment in time, but at 12, a precious reminder of how little she once was.

You could even simply enfold this in a handwritten letter and it would still be treasured.

...Mama Guardian...

Tuesday, December 4, 2012

No cost gifts from the heart 2...


Always appropriate...

Find a version of this inspiring verse that suits your paper and recipient. Print, frame in an inexpensive dollar store frame, give with pride.

A friend gave me the Desiderata verse when I was just 20 years old. I have returned to it time and time again over the years when I sought peace in my heart.

Help someone else find that peace.

Until next time...Mama Guardian x